Sampling Techniques
Bone Marrow Aspirate and Core
Cytology Sampling Techniques
Dermatology
Preparing a Blood Film
Causes of poor smears and their solutions
Sampling for Flow Cytometry

Bone marrow aspirates allow for detailed assessment of cell morphology and so can identify relatively subtle changes such as dysplastic features, disordered or arrested development of an individual cell line and allow for detailed evaluation of a leukaemic infiltrate. However it is difficult to assess marrow cellularity or for the presence of fibrosis with aspiration and these are better assessed with a core biopsy. Since the aspirate and core give different information the two samples are often taken at the same time.
Depending on the site of aspiration, the bone marrow aspiration and core biopsy can be performed under general anaesthesia or with sedation and local anaesthesia. The proximal humerus is generally the preferred site although general anaesthesia will be required for appropriate positioning of the patient and because the procedure is painful. Where there is a contraindication for general anaesthesia, the iliac crest can be used with a combination of sedation analgesia and local anaesthesia. The trachanteric fossa and tibial crest are other possible sites.
A high quality bone marrow needle with stylet is required. The main choice is between locked stylet (Jamshidi type) where the stylet cannot be pushed back during insertion and the non locking stylet (Klima and Rosenthal needles) where care has to be taken to keep the stylet in position during insertion. The Jamshidi can be used to obtain both aspirates and core samples, whilst the Klima is only used for aspirates. Do not attempt to perform this procedure a spinal needle. The size of needle should be appropriate to the patient and the site being aspirated.
| Animal Size | Suggested Jamshidi Needle |
|---|---|
| Cats / Dogs <5kg | 16 – 18 gauge |
| Dogs 5-15kg | 15 – 16 gauge |
| Dogs 15-30kg | 13 – 15 gauge |
| Dogs 30-50kg | 8 gauge |
| Dogs>50kg/td> | 8 gauge |
Other required equipment includes microscope slides, a scalpel blade, lignocaine, sterile gloves and drape, a 20 ml syringe and sterile anticoagulant. CPDA collected from a blood transfusion bag is preferable, although a solution of EDTA prepared from a blood collection tube is adequate. EDTA solution is prepared by filling an EDTA tube with the appropriate amount of sterile saline. Ten or so microscope slides are placed leaning on a near vertical slope, eg against a sandbag. Further slides are required for making smears and are positioned nearby.
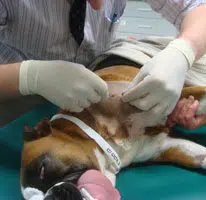
Procedure for sampling from the greater tubercle of the humerus.
- The patient is anaesthetised and be placed in lateral recumbency. This should be right lateral recumbency for a right handed operator and left lateral recumbency for a left handed operator
- The area over the shoulder joint is clipped and surgically prepared
- An assistant flexes both elbow and shoulder joints and rotates the elbow inward towards the body wall, such that the shoulder joint is turned outward. The spine of the scapular and the acromium process at its distal end are palpated. The next bony prominence distal to this is the greater tubercle of the humerus which is the site of the aspirate
- Local anaesthetic e.g. 2% lidocaine is instilled (0.25ml in cats and up to 1-2ml in dogs) into the area, firstly into the subcutaneous tissues using a 23 gauage needle. The needle is advanced down to the surface of the greater tubercle and lignocaine is injected into the periosteum by applying pressure on the needle/syringe
- A small skin incision is made using a scalpel blade over the distal end of the greater tubercle
- The Jamshidi needle is primed with the anticoagulant solution. The stylet is withdrawn from the needle and with the 20ml syringe anticoagulant is flushed through the needle and emptied. The stylet is replaced and locked in place
- The Jamshidi needle is held in the palm of the hand using a pistol grip, with the heel of the needle in the palm of the hand and the needle being supported by the index finger
- The needle is inserted into the greater tubercle parallel to the long axis of the humerus, aiming for the point of the elbow. It may be difficult to get a purchase in the bone, but with repeated twisting of the needle to and fro with firm pressure the needle tip enters the bone cortex. Now further firm pressure is applied whilst rotating the needle to and fro to advance the needle. Similarly firm counter pressure needs to be applied by an assistant to stop the animal being pushed off the table
- Once in the medullary cavity the needle should feel firmly lodged and it should not be possible to wobble the needle from side to side. Indeed the animal could be lifted off the table by raising the needle
- The stylet is removed and the 20ml syringe attached. The syringe is then firmly aspirated by pulling sharply on the plunger 2 or 3 times, applying around 15 mls of suction each time and holding the barrel of the syringe firmly. Bone marrow (thick bloody material) should appear in the syringe. Once marrow appears further aspiration should not be attempted since this could result in haemodilution
- The syringe is removed, leaving the Jamshidi needle in place and marrow is quickly transferred to glass slides before it clots
- A drop of marrow is placed at the top of each of the tilted glass slides. Blood runs down to the base of the slides, leaving marrow spiccules on the slides. Squash smears are made by placing a second slide flat over the first slide at right angles to it, (flattening spiccules) and the drawing the second slide quickly and smoothly over the first slide
- One or two slides should be stained with a rapid dunking stain kit to ensure marrow spiccules have been harvested. Spiccules appears as densly stained blue areas, but it is preferable to check under the microscope that the samples are of diagnostic quality and not excessively haemodiluted
- A core biopsy sample can then be obtained by advancing the needle a further 2-3cm down the humeral shaft without the stylet in place. Once advanced, the needle is moved sideways quickly in different directions or rotated repeatedly in the same direction, to ensure the core is sectioned at its base
- The needle is then withdrawn. The core is pushed out of the needle by placing a blunt probe in the needle tip end and pushing the core sample out of the handle end
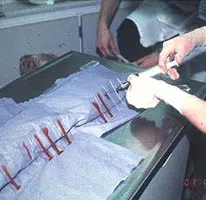
- Impression smears can be made by rolling the core down a glass slide, before placing it in formalin for histopathological analysis
- A sterile dressing is placed and opioid analgesia given for 4-6 hours post procedure.
If attempts at marrow aspiration are unsuccessful this may be the result of poor technique or may be as a result of myelofibrosis or myelopthesis. Aspiration can be attempted at another site such as the other greater tubercle or iliac crest. If repeated aspirates are unsuccessful a core biopsy should be taken. An impression smear of the core can be made by rolling the core onto a glass slide. Lysine coated slides may harvest more cells than standard cells.
Cytology Sampling Techniques
Fine Needle Aspiration
The technique is not a strictly aspetic procedure, but it is wise to clip the area and swab with alcohol. The mass/lymph node is immobilised with one hand and a 23 ga needle +/- a 5 ml syringe is inserted into the lesion. The sample is obtained in 1 of 3 ways:
A.“Needle only” method
This method is useful for aspirating soft masses and lymph nodes and has the advantages that delicate, fragile cells are not damaged by suction and haemodilution is minimised.
- A 23 ga needle is inserted (without a syringe)
- The needle is moved to and fro’ within the mass, whilst redirecting it in many directions
- Care is taken to ensure the needle is not pushed through the mass into the surrounding tissues
- A sample is obtained within the bore/hub of the needle.
B. “Continuous suction” method
This method is useful for aspirating firm masses such as fibrosarcomas which tend not to exfoliate cells well.
- A 23 ga needle with a 5 ml syringe is inserted into the lesion
- Continuous suction is applied by withdrawing the plunger (3 – 5 mls of suction are sufficient)
- Whilst suction is maintained the needle is moved to and fro’ within the lesion, redirecting each time, again taking care to avoid pushing the needle through the mass into the surrounding tissues
- Suction is released before removing the needle.
C. “Intermittent suction” method
This method is suitable for small masses where it is not possible to redirect the needle without exiting the mass.
- A 23 ga needle and 5 or 10 ml syringe is inserted into the mass
- The plunger is withdrawn and released several times
- Suction is released before removing the needle from the lesion.
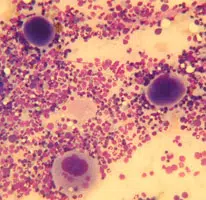
Making the Smear (see images above)
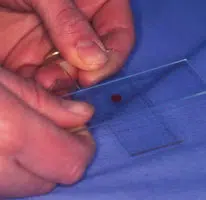
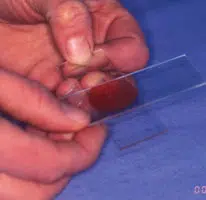
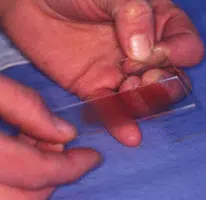
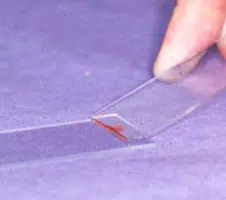
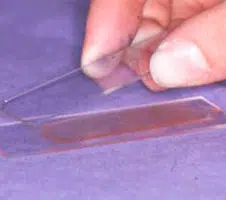
An air-filled syringe is attached to the needle (if the syringe was already attached to the needle it should be disconnected from needle, filled with air and then re-attached to the needle). Holding the tip of the needle over a clean glass slide, the plunger is briskly depressed, thus expelling the contents of the needle onto the slide (image 1 above) (now referred to as slide 1), or, if there is a high harvest, distributing between 2 or 3 slides laid side by side.The sample is then smeared using the squash preparation technique. NB it is very important to smear the sample rather than just squirting it on to a slide, since the cells must be in a monolayer to be evaluated.
A. Squash preparation
- Slide 1 is held in the left hand (for right handed people)
- A second side (now referred to as slide 2) held in the right hand and placed flat onto slide 1 at right angles to it
- This spreads the sample (image 2 and 3 above)
- If necessary gentle pressure may be applied using the right thumb to encourage the cells to spread out. Excessive pressure will result in cell rupture.
The smear is on the lower surface of slide 2
With experience this technique produces excellent smears. Practice is required!
Smearing fluid samples
For turbid samples the blood smear technique is used (see preparing a blood film), or can be modified with the line concentration technique.
Line concentration technique
The sample is smeared as for the blood smear technique, but when the spreader slide has been advanced about two-thirds of the way across the slide the spreader slide is abruptly lifted upwards. This produces a smear with a concentrated line of cells at its end, instead of a feathered edge.
Impression smears
-
- Impression smears are made before and after cleaning the surface of the ulcerated mass with a saline-moistened swab and blotting dry
- A clean glass slide is gently touched to the lesion and immediately lifted off without smearing the slide across the lesion
Impression smears may also be made from the cut surface of tissues obtained at surgery or post mortem. Blood and tissue fluid should be removed by blotting the sample dry before touching the sample onto a slide.
Scrapings
- The lesion is first cleaned and blotted dry
- A scalpel blade is scraped across the lesion’s surface several times
- Material collected on the blade is transferred to a slide by gently teasing it off the blade using a needle or the blade can be used like a paintbrush to gently smear the sample onto a slide
- If the material is thickly spread a squash preparation is made as described for fine needle aspirates.
Swab smears
A swab or cotton bud is used to collect samples from fistulous tracts and from the vagina. Unless the lesion is very moist the swab must first be moistened in isotonic saline. The swab is rubbed against the surface of the lesion and then gently rolled along a slide, taking care not to rub the swab across the slide since this would damage the cells.
Dermatology
Sampling Procedures For Investigating Skin Disease
Skin Scrapes
Should be performed where there is evidence of crusting, scaling, alopecia, erythema or papular/pustular eruptions. To identify Sarcoptes spp, Cheyletiella spp or Demodex spp. Gently squeeze the skin between the thumb and forefinger. Apply 1 drop of liquid paraffin to the area. Scrape the skin area chosen, using a blunted number 10 blade until capillary ooze is created. Scrape the debris gathered on the blade put sample and blade into a sterile universal container. Repeat this in three to five sites and put in the same container, then post it.
Acetate Tape Strips
Used to sample dry, greasy or waxy lesions especially those where Malassezia is suspected. Using a piece of tape (Scotch clear tape preferred) 1 ½ times the length of a slide press the middle of the tape onto the area to be sampled several times. To ensure microorganisms are detected it is best to stain the tape strip using Diff Quik before submission.. The tape is made to form a loop (sticky surface on outside) and is dipped in the pink dye (3 dips) and then purple dye ( 6 dips). The fixative (pot 1 of the Diff Quik set) is not used. The dye is allowed to drip off and the tape is attached to a microscope slide and posted in a slide container.
Glass Slide Impression Smears
Impressions can be taken from any exudative lesion. Pustules should be pricked with a fine gauge needle and then a glass slide pressed to the pustule four or five times, moving the slide slightly every time. The slide should then be heat fixed using a match or lighter before posting in a slide container.
Hair Plucks
To identify Demodex spp, or dermatophte or for fungal culture. Using haemostat forceps pluck hair from the edge of alopecic areas, place in a universal container.
Cotton Swab
For ear cytology. Insert gently into the ear canal, rotate several times and then place in a universal container and post.

- A spreader slide is used. This is narrower than the smear slide to avoid spreading the cells over the edge of the slide. To make a spreader break the corner off a normal slide, having first scored it with a diamond writer or a glass cutter
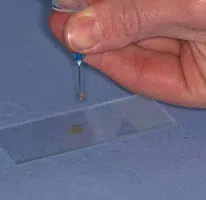
- A drop of blood from a microhaematocrit tube is placed onto one end a slide
- The spreader slide is placed at an angle of about 30° in front of the sample and slid backwards until it comes into contact with the sample drop
- The sample then spreads out along the width of the spreader slide
- The spreader slide is advanced forwards, creating a smear with a feathered edge
- If too much blood is applied to the slide or taken up by the spreader slide the smear will be too long and the cells will be pushed over then end of the slide
- The angle of the spreader slide can be varied to change the size of the smear – a lower angle produces a longer smear. Care should be taken not to make the smear too long. The smear should extend to the middle or distal 2/3rd of the slide so that the examination area is fairly central
- Slides with a frosted end are preferred since these are very smooth and produce good smears which can be easily labelled.
Causes of poor smears and their solutions
| Problem | Cause | Solution |
|---|---|---|
| Smear too long (feathered edge has disappeared off the end) |
Spreader speed too slow Low viscosity blood ie anaemia Excess blood applied to slide |
More rapid spreader speed Apply smaller blood spot |
| Smear too short/thick | Spreader speed too fast High viscosity blood i.e. high PCV |
Slower spreader speed |
| Feathered edge consists of long streaked tails | Uneven contact of spreader with slide Spreader has roughened edge |
Replace spreader Apply even pressure using index finger on top of spreader |
| Smear has holes or gaps | Grease on slide | Clean slides before use |
| Smear thick at feathered edge end of film | Blood in front of spreader | Ensure firm contact of spreader and slide when pulling spreader backwards towards blood spot |
Sampling for Flow Cytometry
Immunophenotyping of lymphoma
0.5 ml of EDTA plasma is obtained by centrifuging a 1 ml blood sample in EDTA. The plasma is placed into an new EDTA tube and 0.5 ml saline added. Aspirates from lymph nodes or other infiltrated organs are harvested into this saline /plasma mix. To ensure that adequate numbers of cells are harvested, 3 aspirates should be taken and injected into one vial. An aspirate is taken in the usual manner, but the harvested cells are injected into the vial of saline/plasma. 0.5mls of the fluid should then be withdrawn back into the syringe and then re-injected into the tube 2 or 3 times, to ensure all cells have been flushed out and to mix the cells thoroughly. The subsequent second and third aspirates should then be added. Samples should be shipped at room temperature and need to reach the lab within no more than 48hrs, preferably 24hrs. Please supply a FNA smear for cytological evaluation along with the cell suspension (even if the cytology was already performed elsewhere). Evaluation of the cellular details is essential in allowing a correct interpretation of the flow cytometry results. Cytology is included in the flow cytometry price.
Immunophenotyping of leukaemia
Blood samples should be sent in EDTA. Please supply a blood film so that morphology can be assessed along with Immunophenotyping. Bone marrow specimens should be anticoagulated in an EDTA solution made by adding saline to an EDTA tube. This solution is used to prime the bone marrow needle and syringe and the remaining solution left in the EDTA tube, to which the bone marrow is added. The tube needs to be mixed very thoroughly to prevent clotting.